

What it is and what it’s for
A contact list is a group of contacts that meet the conditions you define with filters. For example: “customers in the United States who abandoned a cart” or “contacts who didn’t reply to the last campaign.”
Lists are dynamic: they update automatically. When a contact starts meeting the filters, they’re added to the list. When they stop meeting them, they’re removed.
Why you need it: if you send every campaign to all your contacts, each person receives messages that aren’t relevant to them. That lowers replies and increases unsubscribes.
What you use it for:
- Send campaigns only to the audience the message is relevant for.
- Recover abandoned carts or follow up after a sale.
- Reach out again to people who didn’t reply to a previous campaign.
- Exclude contacts who shouldn’t receive a send.
- Keep your audiences up to date without manual work.
Before you start
Keep in mind:
- Only contacts with an Accepted subscription status are included in a list.
- To filter by Orders, your store must be connected to ChateCommerce.
- To filter by Tags, your contacts or chats must have tags assigned. We explain how in Tags: how to create, organize, and use them.
Available filter types
| Filter | What it lets you segment | Options |
|---|---|---|
| Contact data | The contact’s basic information | Email, Name, Phone, and Country |
| Tags | Interests, reasons for contact, or groups | Contact tags or chat tags |
| Orders | Purchase history | Abandoned orders or completed orders |
| Campaign interaction | Behavior in previous campaigns | Was sent or Replied |
Each filter has its own conditions. For example:
- For Country, you can choose “is equal to” or “is not equal to” and select a country.
- For Name, you can choose “starts with,” “ends with,” “is equal to,” or “is empty,” among others.
- For Tags, you can choose:
| Condition | Which contacts it includes |
|---|---|
| Is equal to | Those with that tag |
| Is not equal to | Those without that tag |
| Is any of | Those with at least one of the selected tags |
- For Campaign interaction, if you choose Replied, you define whether the contact replied to all, some, or none of the campaigns you select.
How to create a list step by step
Step 1 — Go to Lists
In the side menu, go to Contacts and open the Lists tab.
Step 2 — Create the list
Click Create list and enter the name. Use a name that describes the audience, for example: “Customers in the US and Canada.”
Step 3 — Add a filter
- Click Add filter.
- Choose the filter type (for example, Contact data).
- Choose the option (for example, Country).
- Choose the condition (for example, Is equal to).
- Choose the value (for example, United States).
- Click Accept.
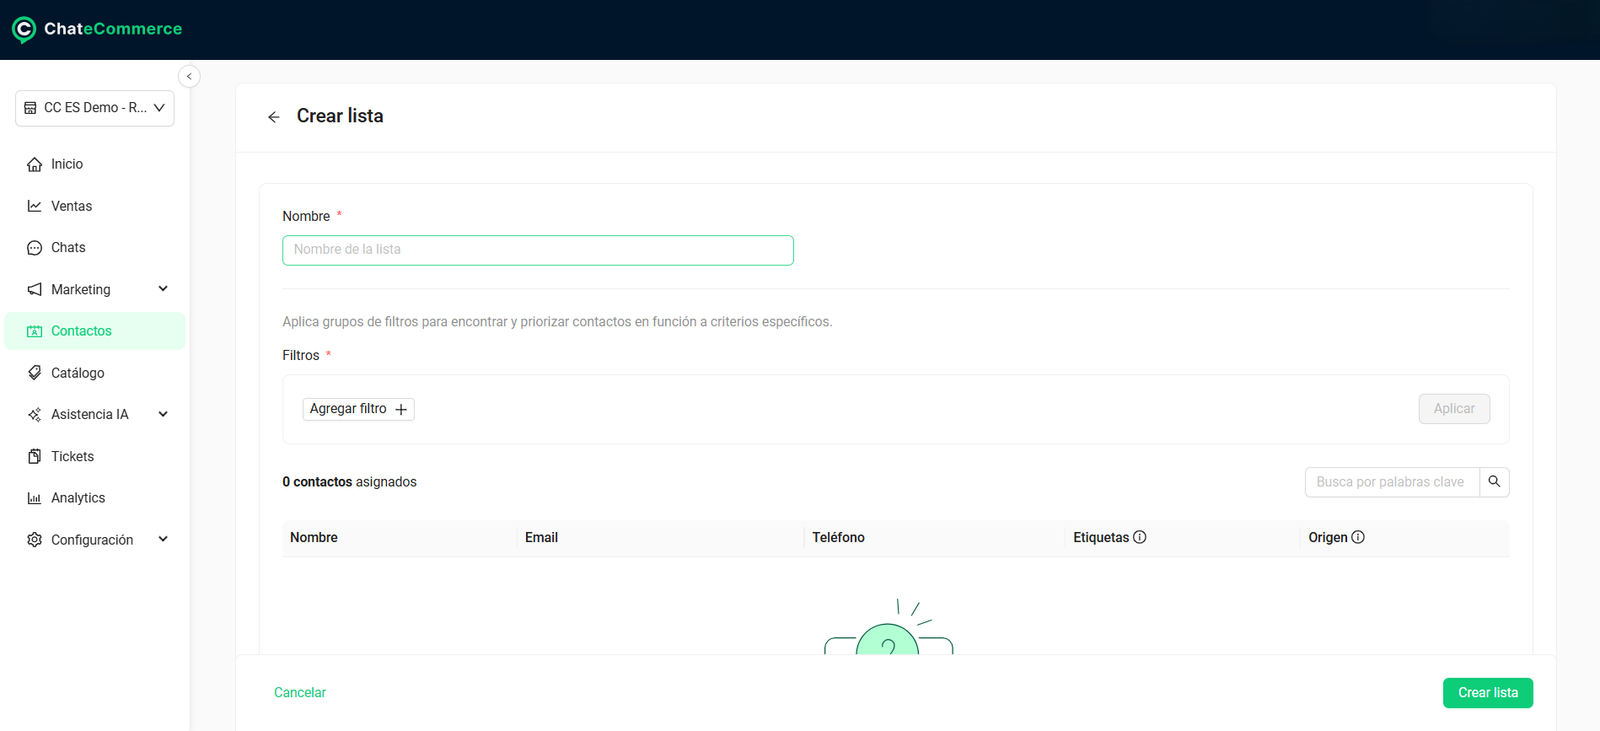
Step 4 — Combine filters (optional)
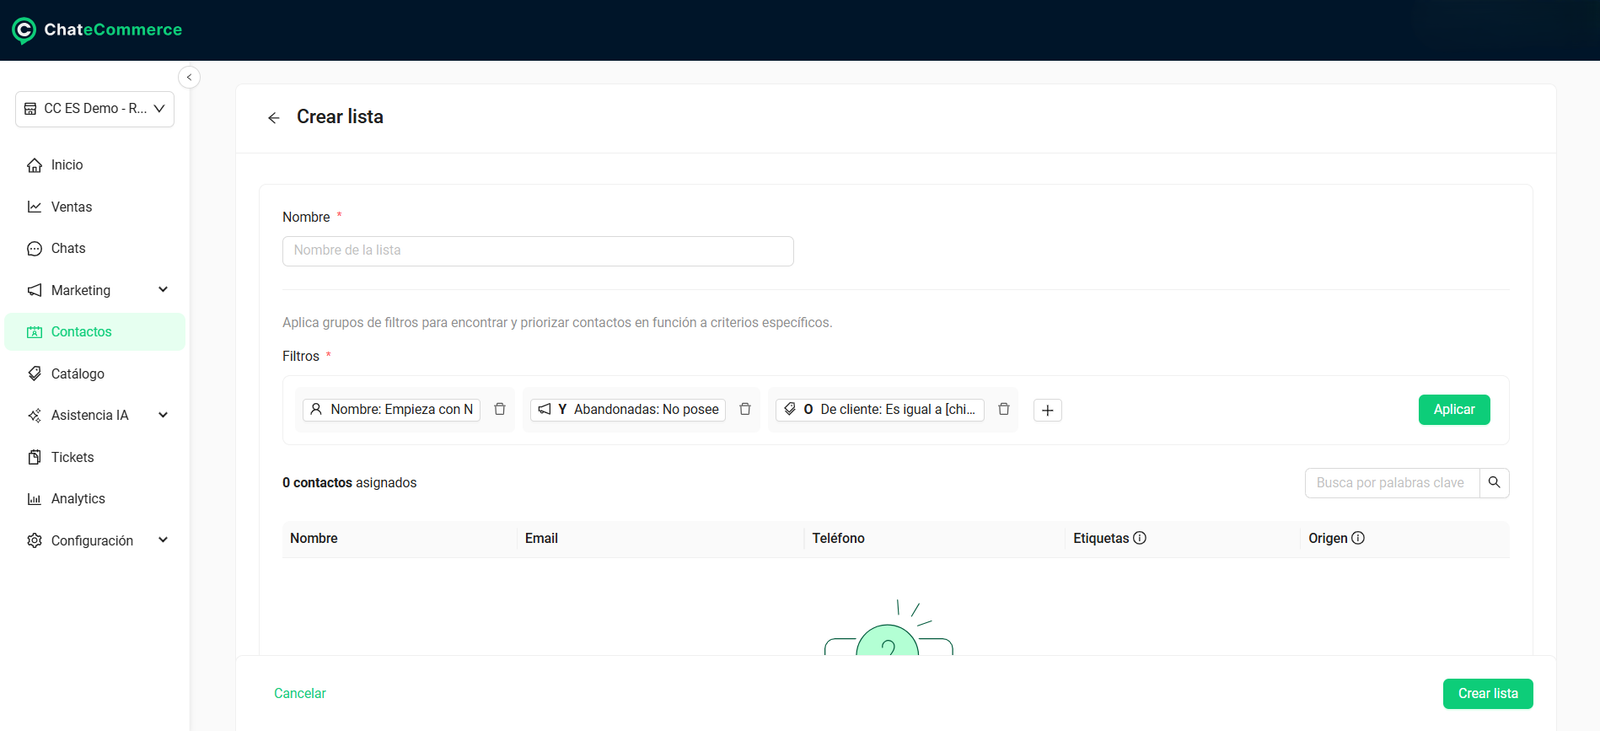
Add another filter and choose the AND or OR operator to combine it with the previous one (see the next section).
Step 5 — Apply and save
Click Apply. Below the filters, you’ll see how many contacts are assigned to the list and the details of each one (name, email, phone, tags, and source). If the result is what you expected, click Create list.
How to combine filters with AND and OR
| Operator | What it does | Example | Result |
|---|---|---|---|
| AND | The contact must meet all the filters | Country is equal to United States AND Abandoned orders | Only US contacts who abandoned a cart |
| OR | The contact must meet at least one of the filters | Country is equal to United States OR Country is equal to Canada | Contacts in the US and also in Canada |
Rule of thumb: each AND you add makes the list smaller. Each OR makes it larger.
How to edit a list
- In Contacts → Lists tab, open the list you want to change.
- In Edit list, change the name or the filters: you can add new filters or modify existing ones.
- Click Apply to see how the list looks with the changes.
- Click Save changes.
You can use the list’s search bar to check whether a specific contact is included.
How it works in practice
Lists update automatically
You don’t need to rebuild a list when your contacts change:
- A new contact who meets the filters is added automatically.
- A contact who stops meeting them is removed. For example, if the tag used by the filter is removed from them.
How to use the list in a campaign
When creating a campaign in Marketing → Campaigns, go to Target audience, choose Contact lists, and select your list.
Examples of useful lists
| Goal | Filters |
|---|---|
| Recover abandoned carts | Orders → Abandoned orders |
| Post-sale follow-up | Orders → Completed orders |
| Promote a product category | Tags → From chat → Is equal to → “Interested in sneakers” |
| Reach out again to people who didn’t reply | Campaign interaction → Replied → None of these campaigns → [previous campaign] |
| Exclude people who already bought a promotion | Tags → From contact → Is not equal to → “Bought Hot Sale 2026” |
| Campaign by country | Contact data → Country → Is equal to → [country] |
Best practices
1. Review the result before saving. Click Apply and check how many contacts are assigned. An empty or very large list usually means a filter is set up incorrectly.
2. Name lists after the audience. “Abandoned cart – US” is easier to understand than “List 3” when you need to choose it in a campaign.
3. Use AND carefully. Each filter combined with AND shrinks the list. If you combine many, you may end up with very few contacts.
4. Use exclusions. “Is not equal to” and “None of these campaigns” prevent contacts from receiving a message that’s no longer relevant to them.
5. Make the most of AI tags. If you use automatic tagging, chat tags let you build lists based on what your customers asked about, without tagging anyone manually.
Common issues and solutions
My list has no contacts or fewer than expected
Possible cause: the contacts don’t have an Accepted subscription status.
Solution: only contacts who accepted the subscription are included in a list. Check the Subscription request field in the contact’s profile.
Possible cause: you combined filters with AND and they’re too restrictive.
Solution: check whether any of them should be combined with OR instead.
Possible cause: the tag filter uses the wrong source.
Solution: check whether you chose From chat or From contact. A contact tag doesn’t appear in a chat filter, and vice versa.
Tip: use the list’s search bar to check whether a specific contact is included. If they don’t appear, check their subscription status and whether they meet each filter.
A contact was removed from the list
Possible cause: they stopped meeting the filters.
Solution: this is the expected behavior of dynamic lists. For example, if the tag used by the filter was removed from them, they’re automatically removed from the list.
I can’t see the option to filter by orders
Possible cause: your store isn’t connected.
Solution: connect your store in Settings → Stores.
Frequently asked questions
Do lists update automatically?
Yes. Contacts are added and removed automatically depending on whether they meet the filters.
Can I edit a list after creating it?
Yes. In Contacts → Lists, open the list, change the name or filters, and click Save changes.
Can I combine multiple filters?
Yes. You can combine them with AND (all must be met) or OR (at least one must be met).
Can I exclude contacts from a list?
Yes. Use conditions like Is not equal to or, in Campaign interaction, None of these campaigns.
Why doesn’t a contact who meets the filters appear in my list?
Because only contacts with an Accepted subscription status are included in a list.
Can I use the tags assigned by the AI?
Yes. In the Tags filter, choose From chat and select the tag.
| Operador | Qué hace | Ejemplo | Resultado |
|---|---|---|---|
| Y | El contacto tiene que cumplir todos los filtros | País es igual a Argentina Y Órdenes abandonadas | Solo contactos de Argentina que abandonaron un carrito |
| O | El contacto tiene que cumplir al menos uno de los filtros | País es igual a Argentina O País es igual a Colombia | Contactos de Argentina y también de Colombia |
