

What it is and what it’s for
A contact is a person registered in your ChateCommerce account: a customer or a potential customer. Each contact has their details (name, phone, country, and email), their tags, and their conversation history.
In the Contacts section, you have everyone in one place. From there, you can edit them, start a conversation, or view their chat.
Why you need it: to send campaigns, build lists, or start conversations, you first need your customers registered as contacts, with their phone number and subscription status.
What you use it for:
- Centralize your customer base in the platform.
- Import the contacts you already have in a spreadsheet all at once.
- Tag contacts to segment them in lists and campaigns.
- Start conversations with customers who haven’t messaged you yet.
Before you start
Keep in mind:
✓ You need your contacts’ consent. To send WhatsApp messages, businesses must obtain people’s acceptance. When you save a contact, you confirm you have that consent, in accordance with applicable laws and the platform’s terms and conditions.
✓ Subscription determines who receives campaigns. Only contacts with an Accepted subscription status are included in the lists you use for your campaigns.
How contacts get into ChateCommerce
| Source | How it works | Example |
|---|---|---|
| Automatic | When someone messages you through a connected channel, a contact is created. | A customer messages you on WhatsApp from your website. |
| Integrations | Integrations with your store or other platforms create contacts. | A customer abandons a cart on Shopify; contacts imported from HubSpot. |
| Manual | You add one contact at a time. | A customer you met at a physical store. |
| Import | You upload several contacts at once with a CSV file. | Your customer base exported from another system. |
The Source column in the list shows where each contact came from.
How to add a contact manually
Step 1 — Open the form
In the side menu, go to Contacts and click + Add.
Step 2 — Fill in the details
| Field | Required? | What to enter |
|---|---|---|
| First name | Yes | The contact’s first name. |
| Last name | No | The contact’s last name. |
| No | Their email address. | |
| Country | Yes | The country of the phone number. |
| Phone | Yes | The number, without the country code (it’s added based on the selected country). |
| Tags | No | One or more Contacts tags. |
| Subscription request | No | Accepted, Denied, or Not answered. Default: Not answered. |
If your account has custom fields (for example, Company), they also appear in this form.
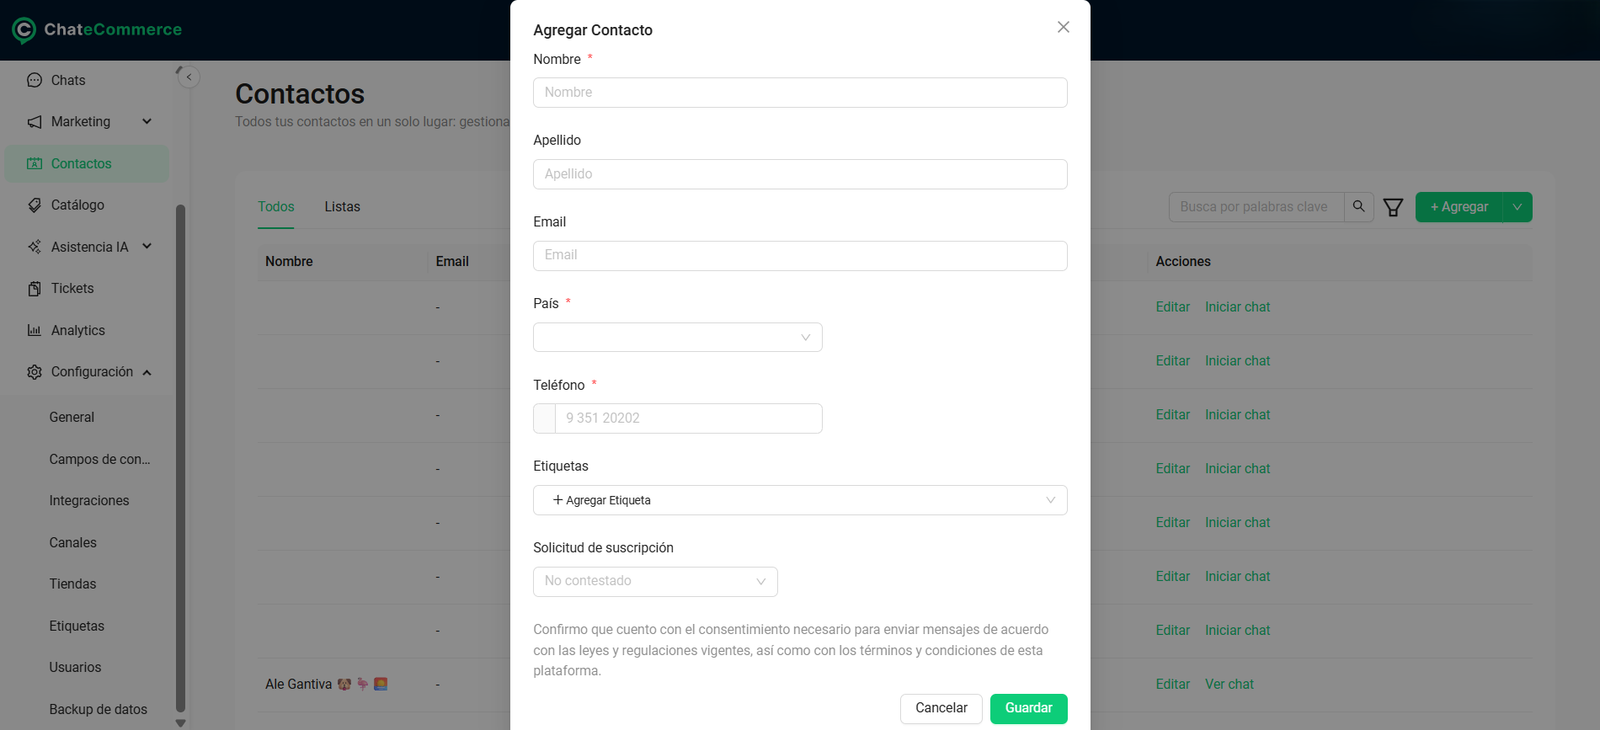
Step 3 — Save
Click Save. By doing so, you confirm you have the contact’s consent to send them messages.
How to import contacts with a CSV file
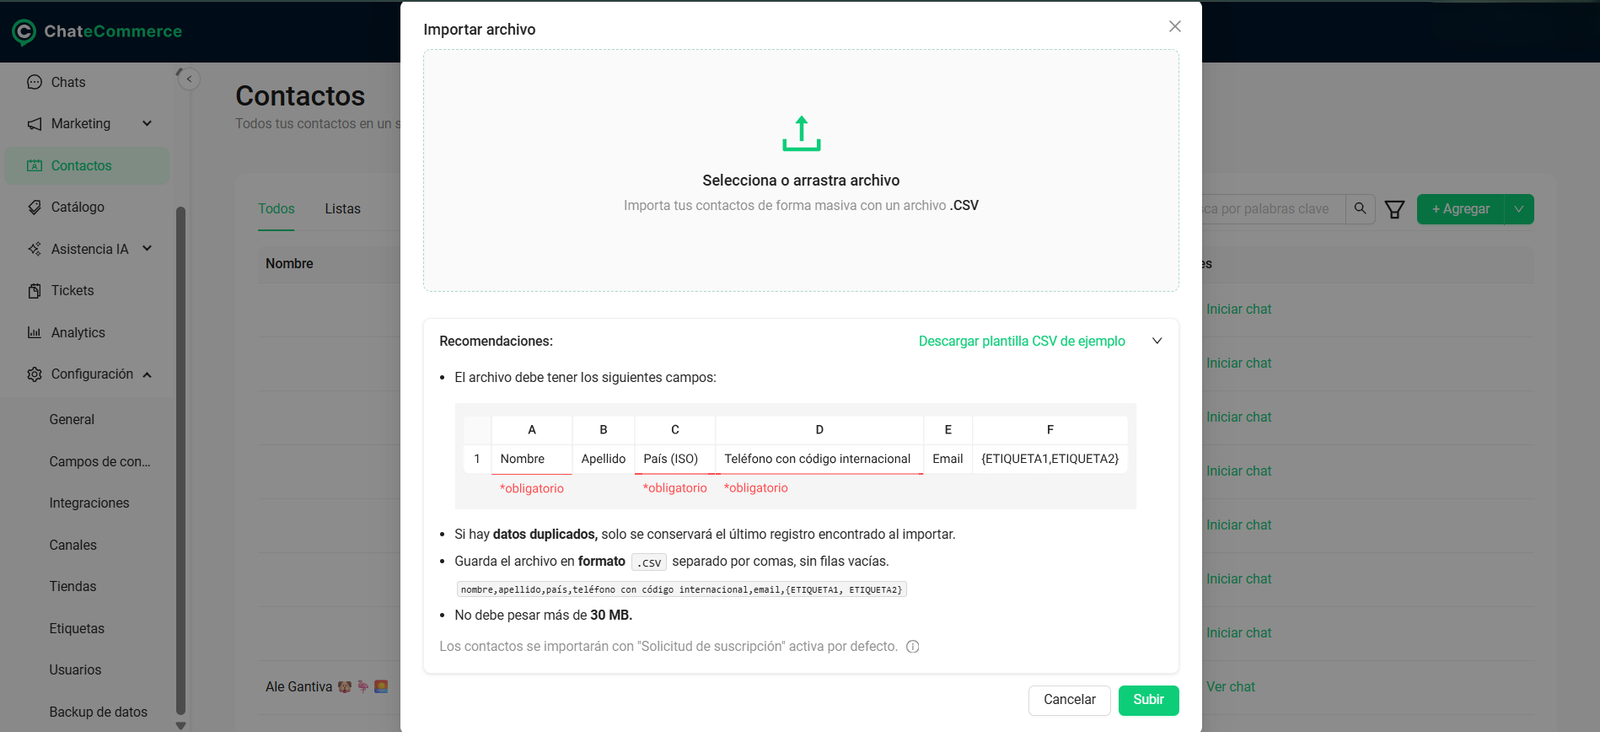
If you have many contacts in a spreadsheet, you can upload them all at once with a CSV file (a spreadsheet format you can export from Excel or Google Sheets).
Step 1 — Open the import
In Contacts, click the arrow next to + Add and choose Import file.
Step 2 — Download the template
Click Download sample CSV template and fill it in with your contacts, following this column order:
| Column | Field | Required? | Example |
|---|---|---|---|
| A | First name | Yes | Anna |
| B | Last name | No | Smith |
| C | Country (ISO code) | Yes | US |
| D | Phone with international code | Yes | 12025550123 |
| E | No | anna@example.com | |
| F | Tags | No | "{Wholesale customer,Interested in sneakers}" |
The file doesn’t have a header row: every row, starting with the first, is a contact.
Example row:
Anna,Smith,US,12025550123,anna@example.com,"{Wholesale customer,Interested in sneakers}"About tags: write them inside curly braces and double quotes, separated by commas, as in the example. The quotes are needed because the file’s columns are also separated by commas.
Step 3 — Save the file
Save the file as a comma-separated .csv, with no empty rows and a maximum size of 30 MB.
Important if you use Excel: in some regional settings, Excel uses a semicolon as the separator. If you open the template and see all the data in column A, edit it in Google Sheets or a text editor, or use Data → From Text/CSV in Excel and choose comma as the separator.
Step 4 — Upload the file
Select the file or drag it into the box and click Upload.
Import rules
| Rule | Detail |
|---|---|
| Format | Comma-separated CSV, with no empty rows or header row. |
| Maximum size | 30 MB. |
| Required fields | First name, Country, and Phone. |
| Duplicate data | The last record found in the file is kept. |
| Subscription | Imported contacts have Subscription request active by default. |
What the subscription request is
The subscription request shows whether a contact agreed to receive marketing messages, such as your campaigns. It’s what determines whether a contact can be part of your lists.
| Status | What it means | Included in campaign lists? |
|---|---|---|
| Accepted | The contact agreed to receive your messages. | ✅ Yes |
| Denied | The contact declined to receive your messages. | ❌ No |
| Not answered | The contact hasn’t responded yet. | ❌ No |
When each status is assigned:
- Contacts you add manually are set to Not answered, unless you choose another status when creating them.
- Contacts you import with a CSV file have the subscription active by default.
- You can change any contact’s status from Edit, in the Subscription request field.
Important: only change a contact to Accepted if they actually gave you their consent to receive messages.
How to manage your contacts
In the Contacts list, each row has these actions:
| Action | What it’s for |
|---|---|
| Edit | Change the details, tags, or subscription status. |
| View chat | Open the conversation with that contact. |
| Start chat | Appears for contacts who don’t have a conversation yet. Lets you message them first, using an approved template. |
You can also use the search bar and filter to find specific contacts.
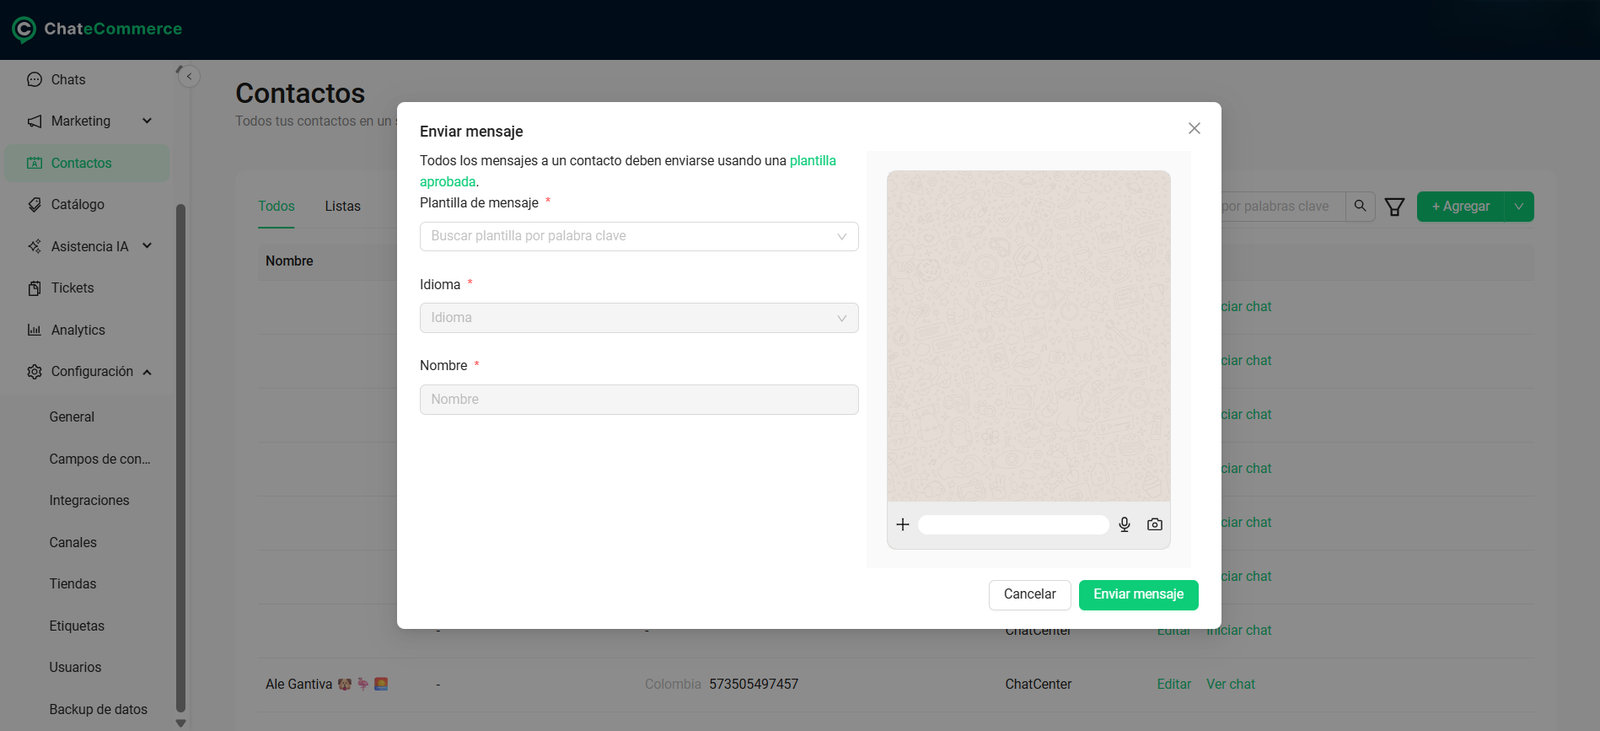
How to start a chat with a contact
To message a contact first, you need to use an approved template: a message with a predefined format that Meta reviews and approves before you can send it.
- In Contacts, click Start chat on the contact’s row.
- In the Send message window, choose the message template. You can search for it by keyword.
- Choose the template’s language.
- Fill in the fields the template requires, such as the contact’s name.
- Review the preview and click Send message.
Best practices
1. Always use the sample template. If you change the column order, the data will be loaded into the wrong fields.
2. Don’t add a header row. The first row of the file must already be a contact.
3. Include the international code in phone numbers. A number without a country code can’t be matched to the right contact.
4. Create tags before importing. In Settings → Tags, create the Contacts tags you’ll use in column F, with the exact same name. That way, your contacts are segmented from the start.
5. Edit the file in Google Sheets or a text editor. This prevents Excel from changing the separator to a semicolon.
6. Check for duplicates before uploading the file. If a contact appears twice, only the last record is kept. Make sure the last one has the correct data.
7. Split large files. If your file is larger than 30 MB, split it into several smaller files.
8. Only import contacts who gave consent. Imported contacts have the subscription active by default. Only include people who agreed to receive your messages.
Common issues and solutions
The file won’t import
Possible cause: the file isn’t a comma-separated CSV, has empty rows, or is larger than 30 MB.
Solution: save it again as a comma-separated .csv, remove empty rows, and check the size.
Possible cause: required data is missing.
Solution: check that every row has First name, Country, and Phone.
All the data appears in a single column
Possible cause: you opened the file in Excel with settings that use a semicolon as the separator.
Solution: edit the file in Google Sheets or a text editor. In Excel, use Data → From Text/CSV and choose comma as the separator.
A contact called “Name” appeared
Possible cause: you added a header row to the file.
Solution: delete that row from the file. The data must start in the first row.
A contact’s data was loaded incorrectly
Possible cause: the column order doesn’t match the template.
Solution: download the sample template and copy your data following its order.
The tags weren’t assigned
Possible cause: the tags aren’t inside double quotes and curly braces.
Solution: write them using the format "{TAG1,TAG2}".
Possible cause: the name doesn’t match an existing tag.
Solution: check in Settings → Tags that the tag exists, is a Contacts tag, and is spelled the same way.
A contact doesn’t appear in my lists
Possible cause: their subscription status is Denied or Not answered.
Solution: only contacts with an Accepted status are included in lists. Check the status from Edit, in the Subscription request field.
I can’t start a chat with a contact
Possible cause: you don’t have any approved templates.
Solution: to message a contact first, you need at least one template approved by Meta. Create it in Marketing → Templates and wait for approval.
Frequently asked questions
What information is required to add a contact?
First name, Country, and Phone.
How large can the import file be?
Up to 30 MB.
Does the file have a header row?
No. Every row, starting with the first, is a contact.
What happens if a contact appears twice in the file?
The last record found is kept.
What subscription statuses are there?
Three: Accepted, Denied, and Not answered. Only contacts with an Accepted status are included in campaign lists.
Can I change a contact’s subscription status?
Yes. From Edit, in the Subscription request field. Only change it to Accepted if the contact gave you their consent.
What subscription status do imported contacts have?
They have the Subscription request active by default.
Can I assign tags when importing?
Yes. Add them in column F, inside double quotes and curly braces: "{TAG1,TAG2}".
Can I message a contact who has never messaged me?
Yes, with the Start chat action. The first message must be sent with an approved template.
